

If you’ve ever wondered how professional YouTubers make their videos look so crisp, colorful, and perfectly paced – chances are, Adobe Premiere Pro is behind the scenes. It’s not just a video editor; it’s a full creative control room. But when you first open it, all those panels, timelines, and color wheels can feel intimidating. Don’t worry – this guide from Inside Editors will walk you through everything step-by-step, from setup to export, so your YouTube videos look every bit as polished as your favorite creators’.
Understanding the Power of Adobe Premiere Pro for YouTube Creators

Premiere Pro has earned its reputation as the industry standard for YouTube video editing – and for good reason. It combines professional-grade features with flexible tools that suit beginners and advanced editors alike. Unlike entry-level editors, Premiere Pro lets you fine-tune every second of your footage: sound balancing, multi-camera cuts, LUT-based color grading, and seamless transitions that turn simple clips into compelling stories.
What makes it so valuable for YouTubers is the balance of creative freedom and technical precision. You can design cinematic intros, add captions or lower thirds for brand consistency, and export your final video in YouTube-optimized formats – all in one place.
But the best way to understand its potential is to dive in.
How Do I Edit YouTube Videos Using Adobe Premiere Pro?
Let’s start with the basics. Every editing process in Premiere Pro follows the same general structure: import – organize – edit – refine – export. Once you grasp this workflow, you’ll move faster and make fewer mistakes.
Step 1: Importing and Organizing Footage

Open Premiere Pro and create a new project. When naming it, always use a structure that’s easy to track – for example, YouTube-Tutorial-Ep01.
Then import your media by dragging clips into the Project Panel or using File – Import.
Organization is everything. Create bins (folders) for:
- Footage
- Music
- Sound Effects
- Graphics / Overlays
Label each clip with clear names (“intro-camera-A.mp4”, “voiceover-track-1.wav”). This saves hours during revisions and keeps your timeline clean – a small habit that separates amateurs from pros.
Step 2: Building Your Story in the Timeline

Drag your clips into the Timeline Panel to start building your sequence. Premiere automatically matches the clip’s resolution and frame rate, but if it doesn’t, adjust manually to match your main camera.
Trim unwanted parts using the Razor Tool (C) or simply drag the edges of each clip. Use the Ripple Edit Tool (B) to close gaps automatically – a pro trick that keeps your timeline tight.
Think of your timeline as your story. Each cut should serve a purpose. If something doesn’t push the story forward or hold attention in the first 10 seconds, consider trimming it.
Step 3: Adding Music, Transitions, and Text

Once your rough cut feels solid, start layering the fun stuff. Drag music beneath your clips, adjusting volume with Audio Gain so dialogue stays clear. Add crossfades at music transitions for smoother flow.
For titles, open the Essential Graphics Panel – a YouTuber’s favorite. Use clean, minimal fonts for your intro or subscribe prompts. Keep them consistent across videos to build brand identity.
Finally, explore transitions sparingly. Simple fades or whip-pans often look more professional than flashy ones. As Inside Editors often says: “If the audience notices the transition, it’s probably too much.”
Step 4: Color Correction and Grading
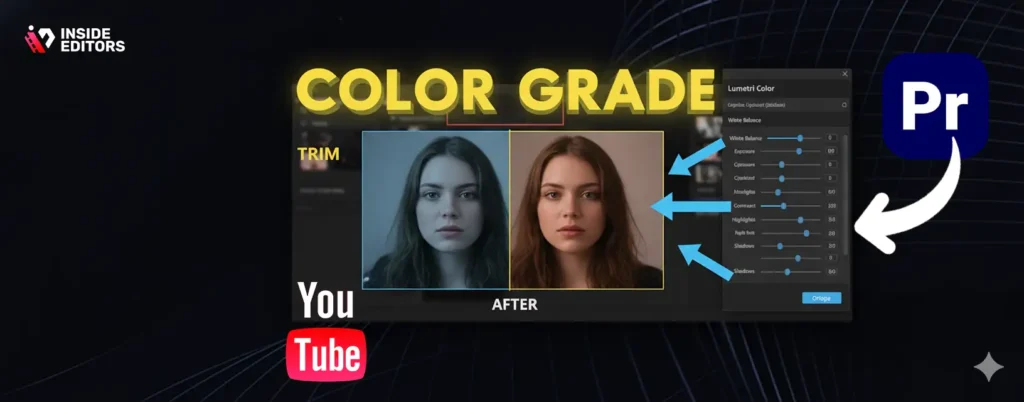
Premiere Pro’s Lumetri Color Panel is where your video starts to shine. Start with Basic Correction – adjust exposure, contrast, and white balance. Then move to Creative LUTs (Look-Up Tables) to apply cinematic tones.
Inside Editors’ pro tip: always fix brightness before tweaking contrast or saturation. This keeps your colors natural and avoids that over-edited “Instagram filter” look.
Step 5: Exporting for YouTube
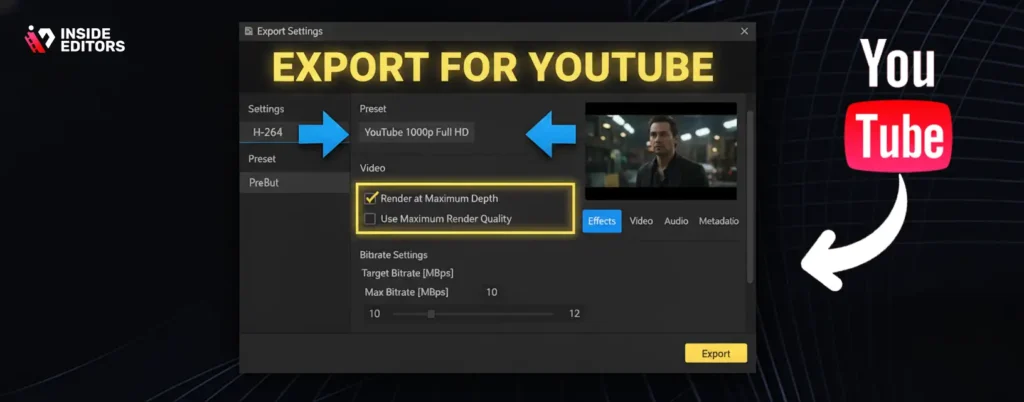
Once everything looks and sounds perfect, go to File – Export – Media. Choose:
- Format: H.264
- Preset: YouTube 1080p HD (or 4K if you shot in 4K)
- Render at Maximum Depth: On
- Use Maximum Render Quality: On
Set your bitrate to 10–12 Mbps for 1080p and 35–45 Mbps for 4K. Premiere’s YouTube Preset automatically configures these, but always double-check before clicking Export.
Which Settings, Presets, and Workflows Should You Use?
YouTube rewards consistency – not just in uploads, but in technical quality. Premiere Pro makes that easier with reusable settings and templates.
Optimizing Sequence Settings
When creating a new sequence, match it to your camera’s frame rate (usually 24, 30, or 60 fps) and resolution (1080p or 4K). Always choose Progressive Scan (p) instead of Interlaced (i) to avoid flickering.
For YouTubers using multiple cameras, enable Multi-Camera Editing. It syncs footage automatically using audio waveforms – no manual alignment needed.
Inside Editors often recommends saving these configurations as Custom Presets. Once saved, you can apply them to every new project and cut setup time by half.
Color Grading Presets and LUTs

Professional-looking videos often owe their visual style to consistent color grading. Premiere Pro supports both free and paid LUT packs – sets of predefined color looks.
For YouTube, aim for clean and vibrant rather than overly cinematic. Slightly boosting saturation and midtone contrast makes faces pop without distorting natural light. You can even apply a single LUT across multiple clips for cohesive tone.
Audio Presets and Mixing
Audio quality is the secret weapon of great YouTube content. Premiere’s Essential Sound Panel offers easy-to-use presets for dialogue, music, and ambience.
If you’re editing talking-head videos, tag your voice clips as Dialogue, then use the Reduce Noise and Compress sliders. These balance levels and remove background hum.
A quick Inside Editors insight: Use the “Loudness Auto Match” feature to normalize audio levels. You’ll avoid that frustrating issue where your intro booms but your outro whispers.
Saving Time with Custom Templates
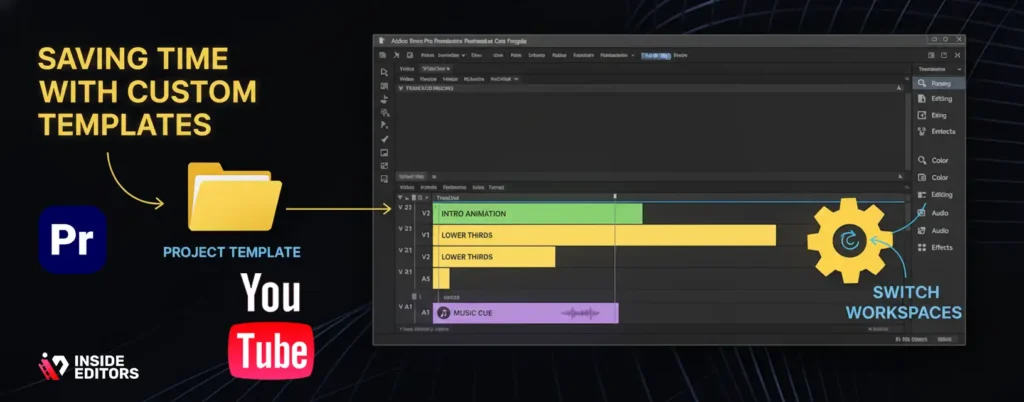
To keep your workflow efficient, create template projects – complete with intro animations, lower thirds, music cues, and graphics. Every new video starts from this foundation, ensuring brand consistency and saving hours of setup time.
Premiere Pro’s Workspaces feature is also a productivity lifesaver. Use Editing, Color, Audio, and Effects Panels as separate layouts depending on the stage of your workflow. Inside Editors’ editors switch between them constantly to stay focused on one task at a time.
How to Make Your Videos Look More Professional
Editing isn’t just cutting clips – it’s storytelling. The difference between an amateur edit and a professional one often lies in rhythm, framing, and subtlety. Let’s explore how you can elevate your work beyond the basics.
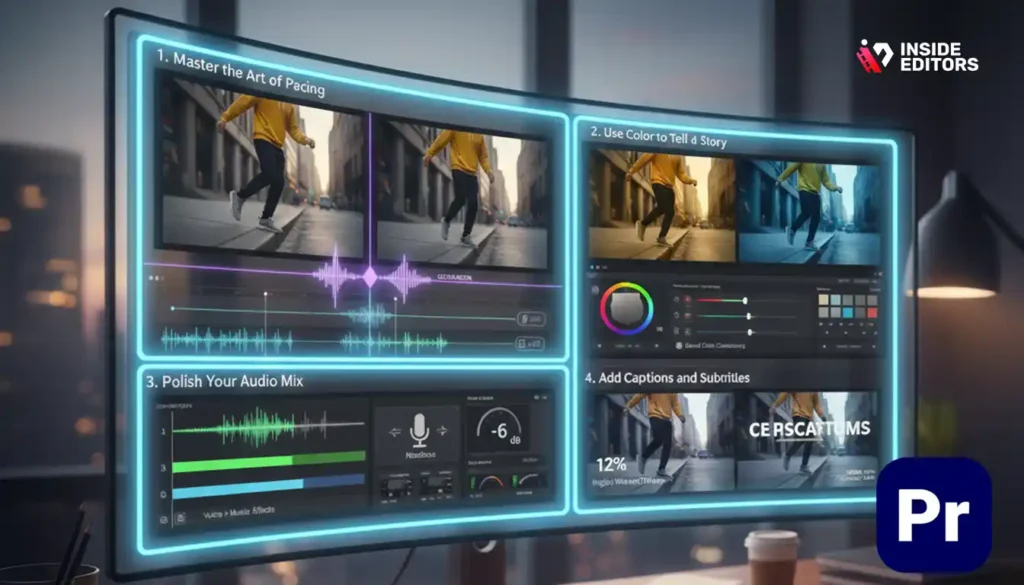
Master the Art of Pacing
Good pacing keeps your audience watching. Every second should serve a purpose – no dead air, no drag. Use cut-on-action techniques (cutting while movement happens) to make transitions feel invisible.
For vlog-style or tutorial content, cut pauses in speech tightly and use J-cuts and L-cuts (where audio leads or lags the video slightly) to keep flow natural. These small techniques make videos feel smoother and more professional.
Use Color to Tell a Story
Color grading isn’t just aesthetics; it’s emotion. Warm tones create friendliness, while cooler tones add calm or tension. When editing for YouTube, think about how color complements your niche – bright, saturated looks for lifestyle or gaming, and softer cinematic tones for education or storytelling.
Inside Editors’ team often uses reference frames from previous videos to maintain brand color consistency. This helps audiences subconsciously connect with your visual identity.
Polish Your Audio Mix
Great sound makes average footage feel cinematic. Always balance voice > music > effects – in that order of priority. Apply subtle reverb only when it fits the scene, and leave plenty of headroom before export (–6 dB to –3 dB for voices).
Premiere’s built-in Loudness Radar Meter is a hidden gem. Use it to monitor your audio dynamics and keep levels consistent across your channel.
Add Captions and Subtitles
Accessibility isn’t optional anymore. Adding captions not only helps hearing-impaired viewers but also boosts retention for those watching without sound. Premiere Pro’s Speech-to-Text tool auto-generates captions – you can then edit timing or font style directly in the timeline.
According to YouTube Analytics (2025), videos with accurate captions see 12 % higher average watch time. That’s a statistic worth your attention.
Common Mistakes Beginners Make (and How to Avoid Them)

If you’re new to Adobe Premiere Pro YouTube video editing, it’s easy to fall into patterns that hurt your final product. Recognizing them early helps you build strong editing habits.
1. Overusing Effects and Transitions
Beginners often try to impress by adding flashy transitions or filters. Unfortunately, this distracts from the message. Keep it simple – use smooth fades, match cuts, and light color tweaks. Let your story, not your effects, hold attention.
2. Ignoring Audio Balancing
Loud background music or inconsistent dialogue is one of the fastest ways to lose viewers. Always prioritize clean audio and test on headphones and speakers before export.
3. Skipping Organization
Messy timelines waste hours later. Keep files named and color-coded, especially for large projects. Inside Editors’ editors color-tag every clip type – blue for A-roll, yellow for B-roll, green for graphics – to stay organized.
4. Forgetting Export Optimization
Many creators finish editing only to upload at the wrong resolution or bitrate. Remember: YouTube compresses everything. Export using its recommended H.264 preset for maximum quality retention.
5. Neglecting Backup and Autosave
Premiere Pro can crash – especially during heavy renders. Set Auto Save to Every 5 Minutes and enable Project Versions in Creative Cloud. You’ll thank yourself when something goes wrong mid-edit.
How to Apply Inside Editors’ Tips Effectively
You’ve learned the structure, tools, and settings – but the real magic happens when you combine them with creative intent and efficiency. At Inside Editors, our professional team has spent years refining a workflow that balances speed, consistency, and storytelling finesse. Let’s explore the practical ways you can bring that same level of polish to your own YouTube editing projects.
1. Start with a Creative Blueprint
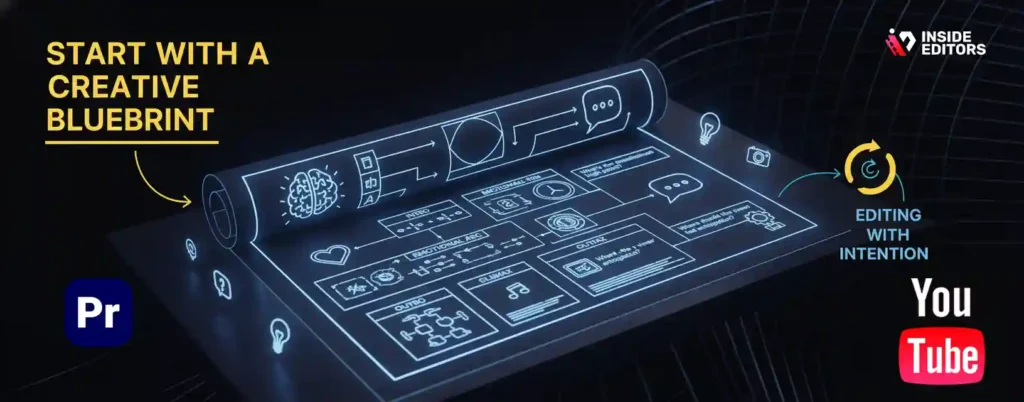
Before touching the timeline, outline your video’s structure and emotional arc. Whether it’s a tutorial, vlog, or reaction, plan the pacing, tone, and transitions beforehand. This prevents you from aimlessly trimming clips and instead guides every edit toward a purpose.
Inside Editors’ editors call this “editing with intention.”
Ask yourself:
- What’s the emotional high point?
- Where should the viewer feel anticipation or relief?
- Which moments deserve silence versus music?
This mindset turns raw footage into storytelling. It’s the difference between cutting at random and cutting with rhythm.
2. Use Adjustment Layers for Efficiency

One of the simplest, most powerful tricks in Adobe Premiere Pro YouTube video editing is the Adjustment Layer. Instead of applying effects clip by clip, stack an adjustment layer above your timeline and apply your LUT, color grade, or sharpness once. Every clip beneath inherits the same look.
This ensures consistency and saves hours in multi-scene projects. Inside Editors uses this technique extensively – not just for color grading, but also for global sharpening, exposure tweaks, or even cinematic letterbox bars.
3. Craft Seamless Audio Transitions

You’ve probably noticed that awkward silence or jumpy music transitions can ruin flow. Fix this using Constant Power or Exponential Fade audio transitions. These create natural fades that smooth over cuts in dialogue or soundtracks.
A good rule: The ear forgives more than the eye. Even if your cuts are sharp visually, smooth audio hides them beautifully. Always end your sessions with a dedicated audio pass – listen with eyes closed and fine-tune based on sound, not sight.
4. Use Motion Graphics Templates (MOGRTs)

You don’t need to design every title or intro from scratch. Premiere Pro supports MOGRT files, which are editable motion graphics templates. Inside Editors customizes branded packs for creators – so you can change text, colors, and positioning in seconds without jumping to After Effects.
MOGRTs are particularly useful for intros, subscribe prompts, or lower-thirds – elements that repeat across multiple videos. Keeping them consistent reinforces your YouTube brand identity.
Advanced Editing Techniques to Level Up Your YouTube Videos

Once you’ve mastered the basics, it’s time to explore features that take your production from good to professional-grade. These techniques are used daily by experienced editors at Inside Editors.
Dynamic Link with After Effects
Premiere Pro integrates seamlessly with After Effects through Dynamic Link – meaning no exports or reimports. You can send a clip for advanced animation, edit in After Effects, and see changes live in Premiere.
This workflow is perfect for YouTubers who need animated infographics, logo reveals, or kinetic text. It keeps your projects light and your creativity limitless.
Proxy Editing for Speed
If you’re working with 4K or 6K footage on a mid-range computer, your system might lag. Enter Proxy Editing – a workflow that uses low-resolution duplicates for editing while keeping the high-res originals linked for final export.
Inside Editors always sets up proxies for travel or interview videos – where dozens of long clips can bog down playback. It keeps your workflow fast without sacrificing quality.
Auto Reframe for Social Media Clips
YouTube Shorts, Instagram Reels, and TikTok thrive on vertical content. Premiere Pro’s Auto Reframe automatically adjusts your horizontal footage into portrait ratios while tracking the subject intelligently.
If you repurpose your YouTube videos for social media, this feature saves huge time – turning one video into multiple platform-ready versions with minimal manual work.
Color Match Across Multiple Cameras
Shooting with different cameras often leads to mismatched tones or brightness. Premiere Pro’s Color Match (under Lumetri Color – Comparison View) analyzes and balances colors between shots.
Inside Editors uses this for multi-angle setups – interviews, product reviews, or multi-location shoots. It ensures your audience never notices the transition between cameras.
Creating Emotion Through Editing Choices

Editing isn’t just a technical skill – it’s emotional architecture. Each cut shapes how your audience feels. You can use editing to create rhythm, tension, or relief without a single word.
Timing is Storytelling
The best YouTube editors understand pacing like drummers understand rhythm. For instance, fast cuts and upbeat music energize tutorials or product showcases, while slower transitions and long dissolves create intimacy in personal stories.
Try watching your rough cut muted. If it still feels rhythmic, you’ve nailed pacing. Inside Editors often tests edits this way before finalizing – because visual rhythm alone should carry engagement.
Layering B-Roll for Depth
B-roll is your visual storyteller. When explaining a concept, overlay supporting visuals instead of keeping a static talking head. This not only improves engagement but also reduces jump cuts.
Premiere’s Rate Stretch Tool (R) helps match B-roll timing with narration – a subtle detail that professionals swear by.
Adding Visual Flow
A well-crafted video flows seamlessly from one idea to the next. To achieve this:
- End each scene with a movement or sound that connects logically to the next.
- Match similar colors or motion between transitions.
- Use subtle camera pans or zooms to guide the viewer’s eye.
These techniques create a cinematic experience – and YouTube’s algorithm notices when viewers stay longer because of that polish.
The Human Element: Inside Editors’ Approach to Professional Quality

At Inside Editors, we believe great editing is about clarity, emotion, and connection – not just tools. Our professional workflow blends storytelling with precision to create videos that keep audiences watching longer and brands looking sharper.
1. Story Comes First
Even with the most advanced tools, editing should serve the narrative. Whether it’s a brand film or a gaming vlog, we ask: “What emotion should the audience feel here?” Every cut, fade, and sound cue supports that answer.
2. Collaboration and Consistency
Inside Editors uses shared project systems so multiple editors can collaborate on the same YouTube series. This ensures consistent tone, color, and pacing across all videos – vital for growing channels that post weekly.
3. Time Efficiency and Revision Control
We understand creators have deadlines. Our editors set up automated templates and version-controlled exports so updates or re-cuts can happen within hours, not days. That’s why Inside Editors has become the trusted partner for creators who value both speed and quality.
When to Outsource Your YouTube Video Editing
You can absolutely learn to master Premiere Pro – and this guide is your foundation. But as your channel grows, editing can eat up your creative energy. That’s when professional editors step in.
If you’re spending 6–8 hours on a single edit, you’re not alone. Many successful YouTubers eventually delegate editing to focus on scripting, filming, and audience engagement. Outsourcing doesn’t mean losing control – it means gaining time and quality.
At Inside Editors, we often help creators transition smoothly from DIY editing to professional support. We maintain their style, refine their workflow, and deliver videos ready to upload – optimized for both YouTube and cross-platform promotion. Explore Inside Editors’ Video Editing Services
Final Thoughts: From Rough Cut to Remarkable Story

By now, you’ve learned that Adobe Premiere Pro YouTube video editing is not just about pressing buttons – it’s about understanding rhythm, emotion, and intent. The best editors don’t simply cut videos; they craft experiences.
When you combine smart workflows, storytelling insight, and a touch of creative courage, you can make even a simple clip unforgettable.
And if you ever need expert hands to elevate your work, Inside Editors is here – not to replace your creativity, but to amplify it. Because great editing doesn’t just make videos look better; it makes stories feel alive.
Recommended Reading on Inside Editors:
FAQs – Complete Guide to Adobe Premiere Pro YouTube Video Editing
How do you ensure trust, quality, and ownership when using an editing service?
Reputable services deliver clear contracts that state ownership, revision limits, and privacy policies; ask for sample NDAs if your footage is sensitive. Check reviews, request a short test edit, and confirm file-delivery formats so you retain full ownership of masters and final MP4s. Inside Editors, for example, keeps raw files private, provides revision rounds, and hands over original project files on request.
Should I edit in Adobe Premiere Pro myself or hire a pro?
DIY in Adobe Premiere Pro is cost-efficient for simple videos and gives you full creative control, but it’s time-intensive – especially if you want consistent branding or fast uploads. Hiring a pro saves hours (often 4–10+ per video) and brings polish, templates, and revision workflows; consider outsourcing once editing takes more of your week than filming or audience growth.
What does professional YouTube editing typically cost and what’s included?
Basic single-camera edits commonly range from $40–$150 per video (short-form or single-cam), while full-service edits with color grade, motion graphics, and revisions often sit between $200–$900+ depending on length and complexity. Price usually covers A-roll editing, one round of revisions, music licensing guidance, and final exports; extras like multicam, custom graphics, or rush delivery are billed separately.
How long does a typical edit take and are rush options available?
A standard 8–12 minute YouTube edit typically takes 24–72 hours for a single editor with one revision round; more complex projects with multicam, heavy graphics, or sound design can take 3–7 business days. Most services offer rush options (24–48 hours) for an extra fee and depend on clear assets, synced audio, and timely client feedback to meet fast turnarounds.
What are simple, skimmable steps to edit a YouTube video in Premiere Pro?
Start by importing and organizing clips into labeled bins, then create a sequence that matches your main camera settings; assemble a rough cut, tighten pacing with ripple or roll edits, and add B-roll and music. Finish with a dedicated audio pass, basic color correction in Lumetri, and export using the H.264 YouTube preset for consistent quality and fast uploads.
Which Premiere Pro settings and presets reliably work for YouTube videos?
Use a sequence that matches your camera’s frame rate (24/30/60 fps) and resolution (1080p or 4K), choose H.264 export with YouTube 1080p/4K presets, and set bitrate to 10–12 Mbps for 1080p or 35–45 Mbps for 4K. Use adjustment layers for consistent LUTs, enable “Render at Maximum Depth,” and run “Loudness Auto Match” in the Essential Sound panel to keep audio stable across uploads.


